This website and league exist thanks to the generous contributions of our community. If you enjoy the league, please consider supporting us with a one-time or monthly donation, starting from just $1. Your support helps us maintain and improve the experience for everyone. Learn more about how your contributions are used and our support goals here.
Current Montly Support: $36*. Top 10 Supporters:
1.  iNdo ($20)
1.
Newbtier ($20)
...
3.  Nate ($10)
3.
Ash.Green ($10)
3.
k1mura ($10)
...
* Before Ko-fi/PP cut.
[PvZ] FFE Opening Guide by Semih
Author: WorsT
Forge Fast Expand
I. Introduction
II. Overview
III. Zerg Openers – How to Identify & Build Order Response
IV. Walling – General Guidelines
V. Walling – Reference
I. Forge Fast Expand Introduction
Forge expand builds are good because they allow you to get a fast expansion while being able to survive solely on cannons in the early game, while also getting relatively quick tech.
Furthermore, in instances where the Zerg opens hatch first (e.g. 11 or 12 hatch) you have the option to perform a simple cannon rush to kill the first hatchery, map permitting, which often ends the game almost immediately.
The downside to forge expand is that you cannot exert early game pressure, so the Zerg will often be able to build drones aggressively in the early game. Additionally, scouting becomes extremely important because, after the first scouting probe is killed, your next opportunity to properly scout generally does not occur until your first corsair is produced.
This lack of scouting and early game pressure gives Zerg the opportunity to open with aggressive, game ending builds such as hydra busts (973), and it’s very important that you are able to scout out these attempts and respond accordingly.
II. Forge Fast Expand Overview
Forge fast expand always starts with building a pylon on 8 supply in your natural, and the positioning should be as such so as to build a proper wall-off. This probe is sent to scout, and your tenth probe is rallied to the natural to make a forge at 11 supply if the Zerg opener has not been scouted on your first attempt. On 4-player maps, this probe is also sent to scout.
What happens next depends on what you scout from the Zerg, which will either be a spawning pool first or hatchery first opener.
These are the possible openings for Zerg:
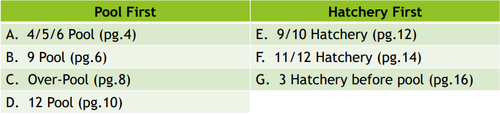
III. Zerg Openers – Identify & Response
The following slides will discuss how to identify the Zerg openers mentioned on the previous page, as well as a general build order to follow in response to said openers.
These build orders are not hard and fast rules, but rather general guidelines on optimal build order responses. You should be able to follow these build orders specifically and be fine in those scenarios, given that you properly identified the Zerg opener.
If at some point during the early game you may have incorrectly identified what was going on, the general rule of thumb in terms of safety is that if you start your forge when the spawning pool is about halfway done, you will always be able to get cannons up in time before zerglings arrive.
A1. 4/5/6 Pool – How to Identify
This is not hard to identify, because if you scout a Zerg on your first attempt there will be only 4-6 drones and a spawning pool nearly complete.
Scouting a Zerg on your second attempt will also reveal 4-6 drones but the spawning pool will most likely be done at this point --
A2. 4/5/6 Pool – Build Order
When this is scouted, a second pylon should be made next to the nexus immediately with a cannon in the mineral line to follow. The probes will need to protect the cannon while it warps in, but once it’s up, you will be safe.
Defending this attack does not automatically win you the game, as the Zerg will have made an expansion hatchery in the meantime. From here, it’s best to proceed with the game as if you were opening with a 2 Gateway opener.
B1. 9 Pool – How to identify
A 9 pool will be started around 1:05 which means that it will be already started by the time you scout Zerg regardless of whether you scout them on your first or second attempt.
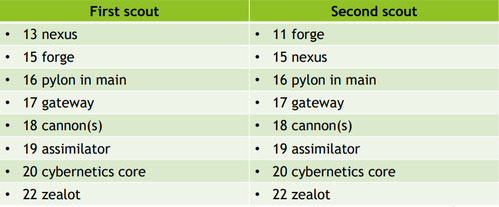
If you scout a 9 pool on your first attempt you will see:
- A half-completed spawning pool
- 8-9 drones
- An extractor being made if they opted for gas
If you scout a 9 pool on your second attempt you will see:
- A spawning pool finished or just about to finish
- 9 drones
- Gas being mined if they opted for an extractor
- An overlord that has just spawned or just about to spawn
When opening 9 pool, the natural hatchery will be made around 2:10
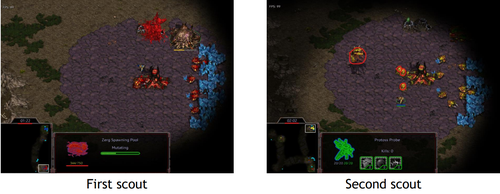
In our first scout we notice that the Zerg has performed an extractor trick to get another drone which is common with 9 pool openers. We also see the pool is about halfway done, and we can count 9 drones with a 10th morphing.
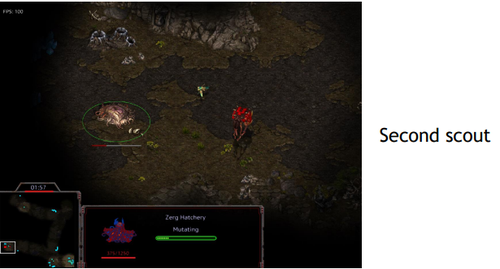
In our second scout, the easiest way to identify that this is a 9 pool is from the position of the overlord, which is pretty close to the hatchery because it’s just spawned, as well as the 3 eggs morphing which is almost always 6 zerglings. If this were an over-pool, the overlord would be further from the hatchery; usually around the natural expansion area at this point.
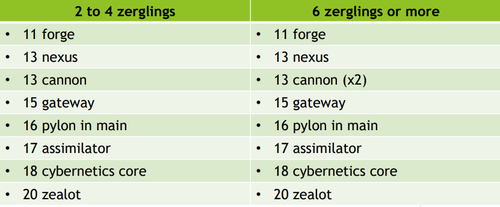
B2. 9 Pool – Build Order
When this is scouted, there’s two things to consider:
-
Was there a gas made
- 9 pool with gas indicates ling speed which could be some sort of ling bust, or to prevent scouting so as to hide some sort of tech
-
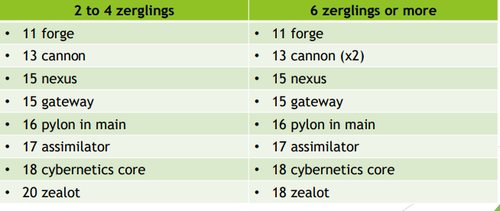
How many zerglings were made
- 2 to 4 zerglings would only require 1 cannon before nexus
- 6 zerglings or more would require 2 cannons before nexus
The general build order is as follows:
C1. Over-Pool – How to identify
An over-pool will be started around 1:14 which means that it will be already started by the time you scout Zerg regardless of whether you scout them on your first or second attempt.
If you scout an over-pool on your first attempt you will see:
- An overlord that has just completed
- A spawning pool that has just started
- 8 drones
- Drones being morphed
If you scout an over-pool on your second attempt you will see:
- A second overlord flying outside the base, usually towards the natural
- 10 drones
- A drone being sent towards the natural to expand
When opening over-pool, the natural hatchery will be made around 2:00
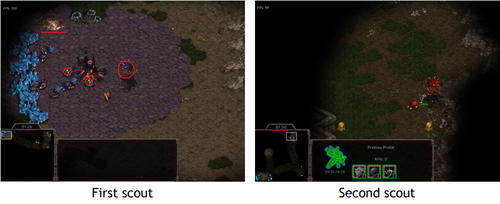
In our first scout, we can see the relationship between the position of the overlord, the morphing of more drones, as well as the timing of the spawning pool to determine that this is an over-pool opening.
In our second scout, we can determine this is an over-pool with this minimal amount of information. On a second scout attempt, the overlord will be around the natural expansion, and we know that Zerg wants to build their natural hatchery around 2:00 after an over-pool, so the overlord position along with the drone at this time in-game is all we need to know.
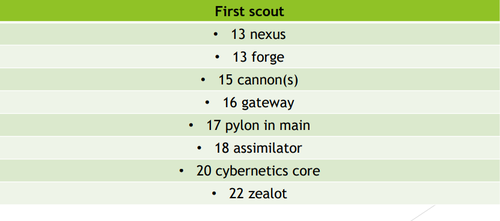
C2. Over-Pool – Build Order
This is the most popular opening for Zerg because it allows for early enough zerglings to defend pressure-based builds while still affording them enough economy to be able to double-expand if they so choose. When this is scouted we must monitor how many zerglings were produced, however, regardless of the amount we will still make a nexus before a cannon(s) in this scenario. The general build order is as follows:
D1. 12 Pool – How to identify
A 12 pool and a 12 hatchery build have the same opening where a Zerg goes for a 9 overlord and then produces drones until 12 before a pool or hatchery is made.
Generally, Zerg only goes for 12 pool when they were attempting to go 11 or 12 hatch first and were scouted early. So, they just throw down a 12 pool because they think the scouting probe might harass the hatchery too much.
If you scout a 12 pool on your first attempt you will see:
- An overlord just being produced with no other buildings
- 9 drones
- 3 additional drones being made followed by a spawning pool
You will probably never scout a 12 pool on a second scouting attempt.

This image looks very similar to how an over-pool might look on your first attempt, however, we can see here that the pool has clearly been made in response to the Zerg seeing the scouting probe.
The overlord distance from the hatchery is similar because both builds start with an overlord before pool, and additional drones are also being made. In order to identify this build, you will simply have to pay attention to whether the pool was made before or after the drones were morphed following the spawning overlord.
D2. 12 Pool – Build Order
This opening is most common when a Zerg who was attempting a 12 hatchery gets denied, so a 12 pool is made instead.
When this is scouted, as with all other spawning pool openers, the amount of zerglings made must be considered, however, you will always be able to make a nexus before a forge and cannons in this scenario.
The general build order is as follows:
E1. 9/10 Hatchery – How to identify
A 9 hatchery opener will start a hatchery roughly around 1:15, while a 10 hatchery opener will start slightly later.
The important thing to note is that a 9 hatch will likely start right before, or just as your scouting probe arrives if you scouted on your first attempt.
If you scout Zerg on your second attempt, there will already be a hatchery being made and will be somewhere between 50 – 75% completed.
Be mindful that if your opponent opts for a 9 or 10 hatch opener they will likely be applying a large amount of pressure with zerglings, if not outright attempting an all-in zergling bust.
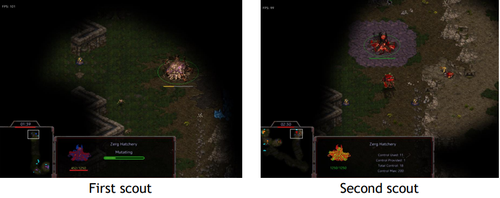
In our first scout, we can see that a hatchery is already well underway at the 1:39 mark. It’s important to keep in mind that a normal 11 hatch doesn’t start until 1:40, so clearly this hatch was started before then, which indicates either a 9 or 10 hatch opener.
In our second scout, because of the creep spread, we see that the hatch has just finished at the 2:30 mark. A hatchery takes ~75 seconds to complete which indicates that this hatchery started at 1:15 which is a normal 9 hatch start time.
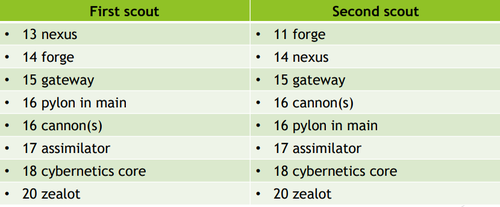
E2. 9/10 Hatchery – Build Order
This build usually indicates some sort of early zergling attack.
When this is scouted, the build diverges based on whether it was scouted on your first or second attempt. The amount of zerglings made must be considered and usually two cannons must be made along with using probes to block
The general build order is as follows:
F1. 11/12 Hatchery – How to identify
A 12 pool and a 12 hatchery build have the same opening where a Zerg goes for a 9 overlord and then produces drones until 12 before a pool or hatchery is made.
If you scout a 12 hatch on your first attempt you will see:
- An overlord just being produced with no other buildings
- 9 drones
- 3 additional drones being produced
If you scout a 12 hatch on your second attempt you will see:
- A 12 hatch will start around 1:40 so there will be a hatchery already being produced with around 300-500 HP
- 9 drones
- A spawning pool just being started
When your opponent opens 11/12 hatch, it’s possible to perform a cannon rush, map permitting, which can end the game almost immediately.
When you pylon scout, your probe will reach the Zerg base around 1:15 if you scouted them on your first attempt. Because of this, Zerg will usually either make a 12 pool, or try to send out multiple drones in order to make the 11 hatch either in the natural or the 3rd expansion.
On your second scout, however, you will see a hatchery just starting to morph, as well as an overlord flying around the natural area. If you recognize this, you have the option to cannon rush, map permitting.
F2. 11/12 Hatchery – Build Order
If you are able to scout this build on your first attempt, it’s possible to deny the early hatchery placement, at which this would most likely devolve into a 12 pool.
When this is scouted, the build diverges based on whether it was scouted on your first or second attempt.
The general build order is as follows:
G1. 3 Hatch before Pool - Identify
Although this build is rare, it is easy to identify. It will start with a 12 hatch opener, however, if you do not see a spawning pool being produced by ~2:00 then a third hatchery before a spawning pool is most likely the reason why.
If this is the case, be sure to scout potential third bases, or even your main for the third hatchery position.
Like with an 11/12 hatch opener, if your opponent does this opening you can easily cannon rush them, map permitting.
G2. 3 Hatch before Pool – Build Order
This build is not very common as it can be severely punished with a simple cannon rush at one of the expansions.
When this build is scouted, the build diverges based on whether it was scouted on your first or second attempt.
The general build order is as follow:

IV. Walling – General Guidelines When it comes to constructing walls in PvZ, in the vast majority of scenarios you will be making either a horizontal or a vertical wall using a pylon, forge, and gateway, and depending on the directionality of the wall, we will need to construct them differently in order to make them optimal.
An optimal wall is one that has a few features:
- As few gaps as possible while still allowing Protoss units to travel freely, including units larger than zealots
- Is completely zergling tight in as many areas as practical
- Allows enough room to make additional cannons in case of hydra busts
In order to construct walls with the required features, we need to understand how some of the Protoss building geometry interacts with other Protoss buildings, as well as the terrain of the map and its included doo-dads (i.e. bone piles, rocks, etc.)
Note that sometimes the interactions between the buildings and the map artifacts will not always be intuitive, and some testing will be required to construct a wall to your preference.
When it comes to building interaction with other buildings, there’s really only a few ideas to be understood. The first one being that a forge placed below a gateway will always be zergling tight, while a forge placed in any other orientation to the gateway will not be as such.
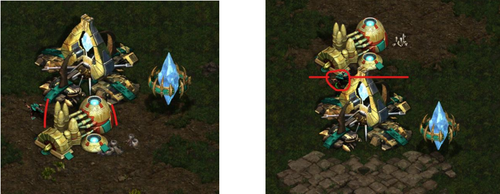
We can see that with the forge on the bottom of the gateway, the zergling cannot pass through, however, with the forge in another orientation, we can see that the zergling is able to pass through the gap created. This idea is important when building vertical walls.
IV. Walling – General Guidelines (cont’d)
The next idea is that when building a horizontal wall, the placement of the forge and gateway are very important.
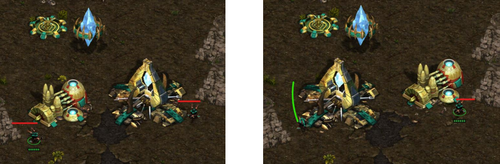
We can see that with the forge on the left side and the gateway on right, zerglings are unable to pass by either side.
If we swap the positions we can see that having the forge on the right still creates a zergling tight position, however, having the gateway on the left creates a gap for zerglings to pass through.
V. Walling - Reference
Now that we understand some of the general ideas behind how walls are to be constructed, we can examine this reference and be able to understand why these walls are constructed in the manner in which they are.
You will notice that most vertical walls are stacked with a pylon, forge, and gateway from bottom up because of the forge and gateway being tight in this position. Additionally, with horizontal walls you will notice that the forge is always on the left and the gateway is always on the right.
If at any point you fail to remember how to make a wall at a certain position, on a certain map, you can always turn to this wonderful guide created by WorsT.
Note that these walls are not hard and fast rules, but rather general examples to be used when in doubt. I encourage you to experiment with wall-making to determine your personal preference for a given map.
https://docs.google.com/document/d/1DZBGMoQYQ94Dbw9T9YGzLskCA-8sZj9U_h6RBuZTzME